Outline
Modes
- Normal Mode, Navigation and manipulation of text
- Insert Mode, Inserting new text
- Visual Mode, Navigation and manipulation of text selections
- Select Mode, Similar to visual, but with more MS Windows-like behavior
- Last Line / Command Line Mode, For entering editor commands
- Ex-mode, Similar to command line mode but optimized for batch processing
Mode: Normal
For navigation and manipulation of text. This is the mode that vim will usually start in, which you can get back to with ESC
For more info do the following in vim:
:help Normal-mode
To make a new line
o
Toggle highlighted cursor
YP
Duplicate current line
*
Search for word under cursor
Case insensitive search
Use the \c for example…
/\cNotCaSeSenSiTive
Turn off beeping sound
In the vim resource file put the following…
set vb t_vb=
Search Strings
Using OR operator
Search applies a Regex.
The following would be valid to search in a file for ab OR cd
/ab\|cd
General
% all lines in a file
> first line of visual selection
< last line of visual selection
. current line
$ last line of file
Command line
ctrl+V
ctrl+W
<C-a>
Increase Num
<C-x>
Decrease Num
[[
]]
Navigate between functions
Mode: Insert
Insert mode is for inserting new text. This would be the mode most Windows users are used to as it is the mode you would get when you open up Notepad in Windows.
For more info do the following in vim:
:help Insert-mode
Mode: Visual
Visual mode is for visually selecting text
Mode: Select
Similar to visual, but with more MS Windows-like behavior
Mode: Last Line / Command Line
The “last line mode” or “command line mode” is for entering editor commands. You can get to last line mode from command mode by pressing the colon key, like this:
:
For more info do the following in vim:
:help Command-line-mode
Execute command against current file
:!%:p
- : for command mode
- ! to rum a shell command
- % to refer to the file in the current buffer
- :p to use the path of the current file
Tab spacing / Indentation
:set tabstop = 2
:set shiftwidth = 2
:set softtabstop = 2
tabstop - size of a hard tabstop
shiftwidth - size of an ‘indent’
softtabstop - a combination of spaces and tabs are used to simulate tab stops at a width other than the (hard) tabstop
View more info here
Navigation
:$
Jump to last line of file
Global Commands
:[range]g/
:g/
:g/<p1>/,/<p2>/d
Deletes inclusively from
Deletes all lines that don’t contain text
:%g!/text/d
Deletes all lines that does contain text
:%g/text/d
Special Characters
shows special characters in file
:set list
hides special characters in file
:set nolist
represents a tab space
\t
Line numbering
:set invnumber
Inverts the number setting
:set number
Turns on the number settings
42G
42gg
:42<CR>
Three different approaches to jumping to the line 42
Read file contents into another file
:r filename
list directory contents in file
:r !dir
Save and exit if modified
:x
Run Macro against visual selection
:'<,'>normal @q
Where @q is the register the macro is stored against
Temporarily Exit Vim and Resume
control+z
- exits
fg
- returns to vim
Set the syntax highlighting
:cal SetSyn("cs")
Set language to csharp
Indention of Html
:filetype indent on
:set shiftwidth=2
:set filetype=html           # abbrev -  :set ft=html
:set smartindent             # abbrev -  :set si
Then either move the cursor to the top of the file and indent to the end: gg =G Or select the desired text to indent and hit = to indent it.
Misc
Integration
Setting GVim as external editor tool for Visual Studio
Using the arguments below, Visual Studio will open up GVim and set the cursor to the current location.
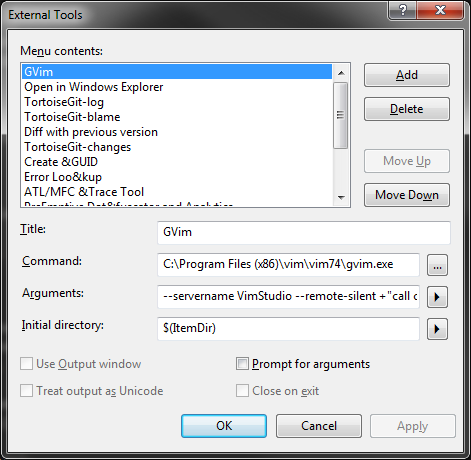
It’s clipped below, but the Arguments are:
--servername VimStudio --remote-silent +"call cursor($(CurLine),$(CurCol))" "$(ItemFileName)$(ItemExt)"
After you’ve done this, just assign a shortcut key to the external tool in options.
Useful Plugins
Spell Checker
Turn on and off
:set spell on
:set nospell
Navigate between errors
[s
]s
Show alternate options for word
z=
Add word to dictionary
zg
Set language
set spell spelllang=en_us
Open files that match a grep search
vim -o $(grep -rl string directory)
Repeat replace all
After making the first correction with z=, e.g. teh to the, use :spellrepall, or shorter: :spellr
Spell References
Clipboard
Setting Vim to use General Clipboard in Linux
When installing a new linux version, often the general clipboard register in vim (“*) does not work with the general system clipboard.
One way to determine if your version of vim supports X which is required for general clipboard support is to type the following in bash :
vim --version | grep clip
If you have a version that supports clipboard, you will see
+clipboard
If you do not have a version that supports it, you will see
-clipboard
In which case you can fix this by reinstalling vim as vim-gtk
sudo apt-get install vim-gtk
You then need to set in your vim rc that the clipboard should work with your general system clipboard. You can do this by having the following in your vimrc
set clipboard=unnamed
If you open up vim and type the following command you will see the clipboard setting.
set clipboard?
Command Line
Open vim with the first file found from search results
vim $(find . -iname "SomeFile.txt")
Open vim with a tab for each file matching results
vim -p $(find . -iname ".txt")
Window Tabs
Close all tabs but the current
:tabo[nly]
Splitting Windows
Vertical split
:vsp
Set vertical split to the right
:set splitright
Set horizontal split to below
:set splitbelow
alternatively
:botright vnew
Opening the browser on a url
Reminder that in Vim you can hit gx when your cursor is on a URL and it will be opened in your browser.
Settings
There are several different levels that you can persist your vim settings, which include:
- System wide configuration /etc/vimrc
- User configuration ~/.vimrc
Formatting
Format Json Data nicely
:%!python -m json.tool
Registers
Great Vim registers explanation
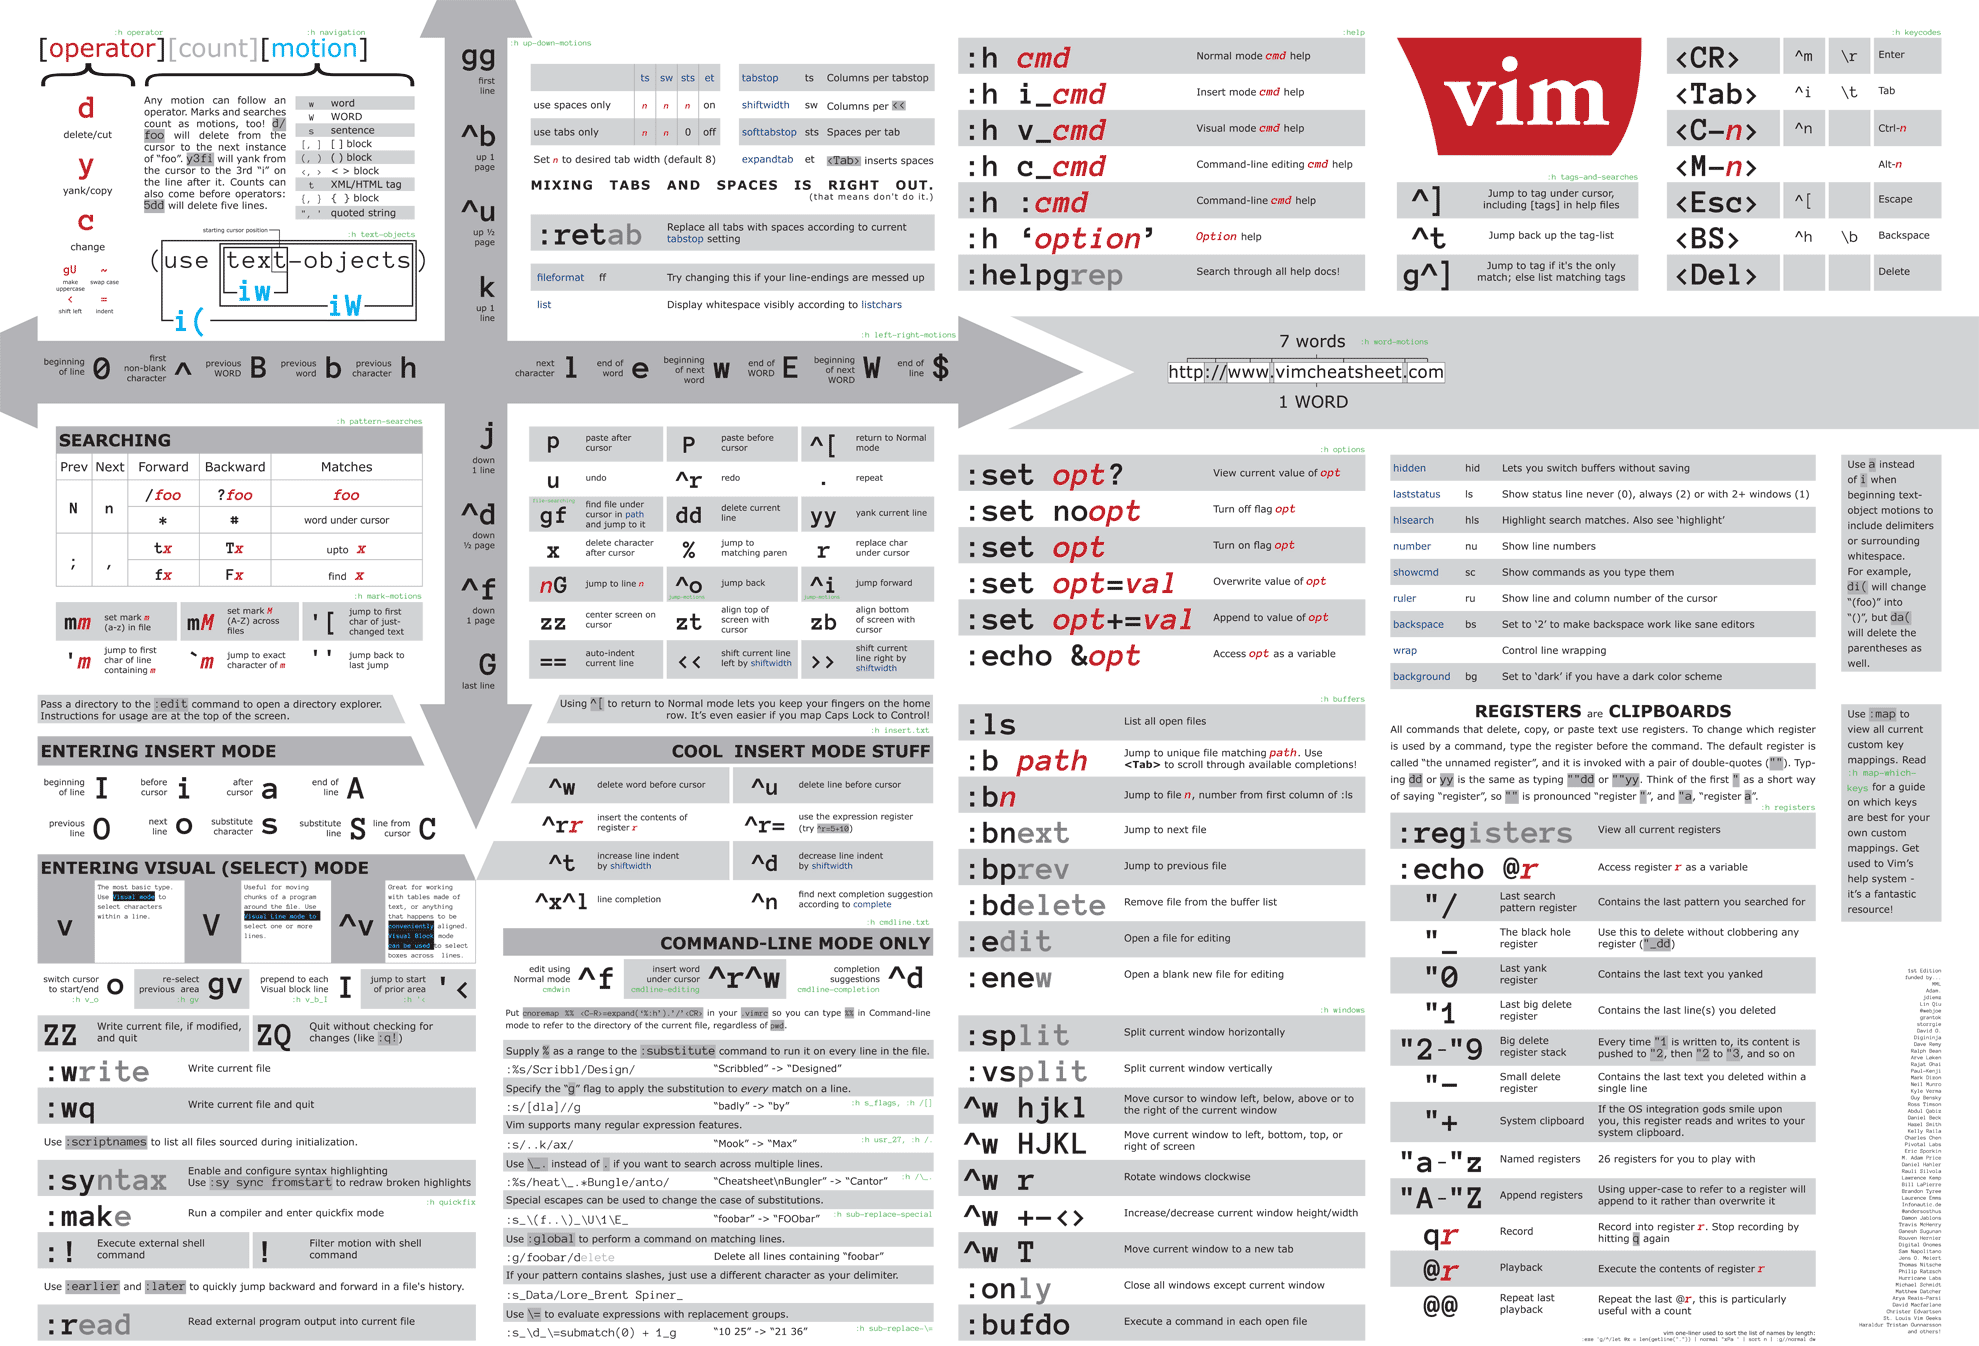
Cheat Sheets
Below are some useful vim cheat sheets to have handy.